Bird nest fern (Asplenium nidus) problems almost always come down to one of four causes: wrong light, wrong watering, pests, or rot. The tricky part is that several of these can look nearly identical at first glance. A frond going yellow could mean too little light, too much water, or a nutrient shortage. A frond going brown and mushy could be rot or a bacterial infection. This guide walks you through how to read the symptoms you're actually seeing, so you can fix the right problem instead of guessing.
Bird Nest Fern Problems: Diagnose and Fix Yellow or Rotting Leaves

Marcus Webb
18 Apr 2026
What gardeners usually notice first
Most people come to this guide because something looks off and they can't quite name it. Here are the most common complaints people have with bird nest ferns, in roughly the order they tend to show up:
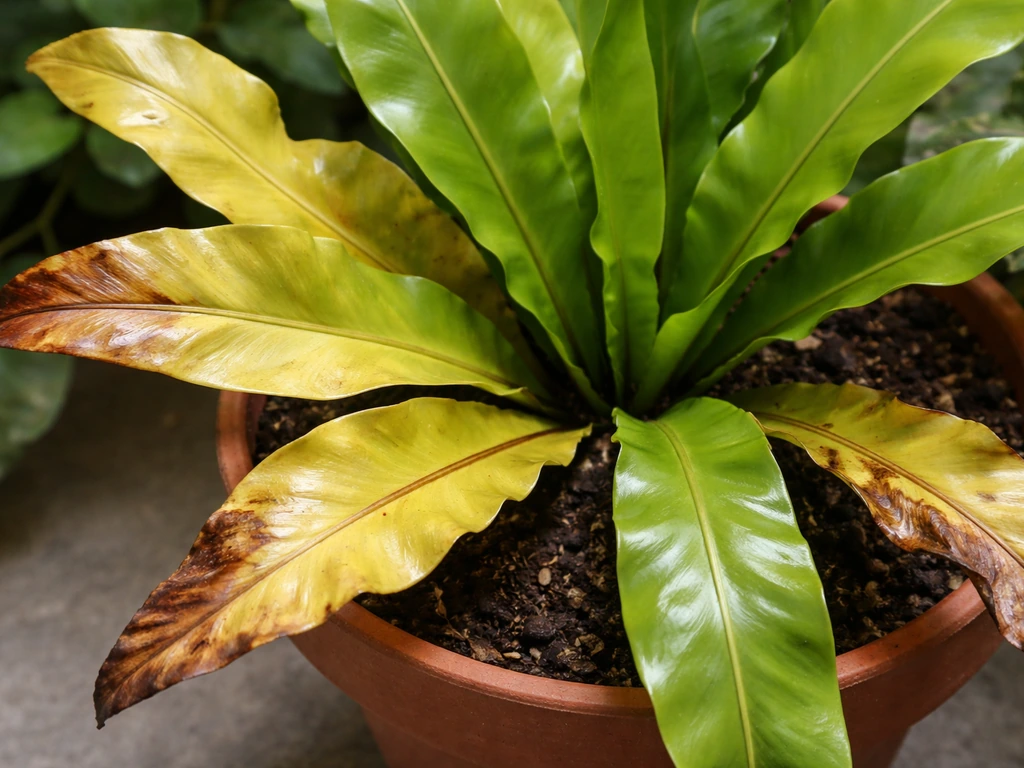
- Fronds turning yellow, either all over or starting at the edges
- Brown, crispy tips or margins on otherwise healthy-looking leaves
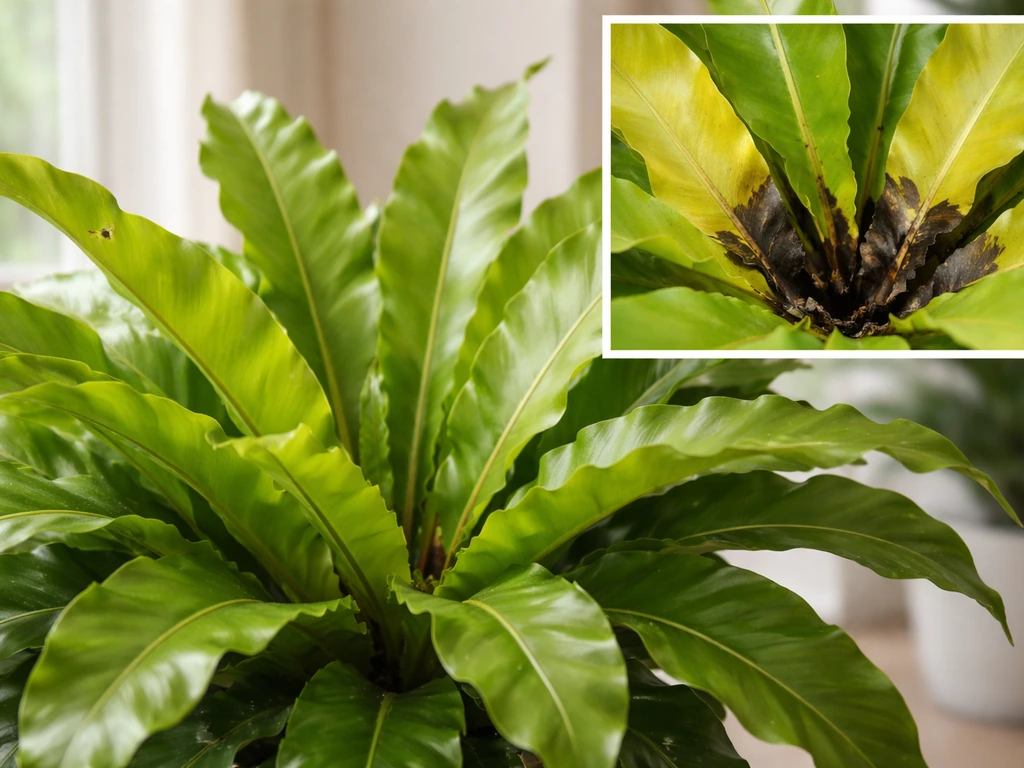
- Black or dark brown soft patches, often starting at the base of a frond or in the center rosette
- Mushy, foul-smelling tissue at the crown or roots
- Pale, washed-out fronds with slow or no new growth
- Tiny bumps, white cottony residue, or fine webbing on fronds
- Stunted new growth that unfurls deformed or discolored
Each of these symptoms has a shortlist of likely causes, and the location of the damage (edges vs center vs base, older fronds vs newer ones) is one of the most useful clues you have. Keep that in mind as you work through the sections below.
Yellow or brown fronds: light, water, and nutrients
Yellowing is the most common complaint and also the most misdiagnosed. The first thing to figure out is where the yellowing starts and which fronds are affected. This matters because different nutrient deficiencies show up in predictable locations: older, lower fronds tend to yellow first when a mobile nutrient like nitrogen is short, while newer growth shows distress first when an immobile nutrient is the issue. Interveinal yellowing (where the veins stay green but the tissue between them goes yellow) points toward something like magnesium deficiency, while uniform yellowing across whole fronds is more likely a light or watering problem.
Light is a more common culprit than most people expect. Unlike some deep-shade ferns, Asplenium nidus does best in bright, indirect light. If it's sitting in a dim corner, the fronds lose their deep green color and growth slows down noticeably. Move it closer to a window with filtered light and watch for new fronds to come in darker and fuller over the next few weeks.
Watering is the other big factor. Both overwatering and underwatering cause yellow fronds, but they feel different. Overwatered fronds tend to be soft and limp before they yellow. Underwatered fronds go yellow and then crispy, usually starting at the tips and edges. If the potting mix is allowed to dry out too much, you may also see leaf margin necrosis: brown, dead edges that don't recover even after you water. Check the soil moisture before watering each time rather than following a fixed schedule.
Brown, crispy tips specifically, without any mushiness, usually point to low humidity, dry air from heating or air conditioning vents, or inconsistent watering. Bird nest ferns like humidity levels around 60 percent or higher. If the air in your home is dry, a pebble tray with water beneath the pot or regular misting of the surrounding air (not directly into the rosette) can help.
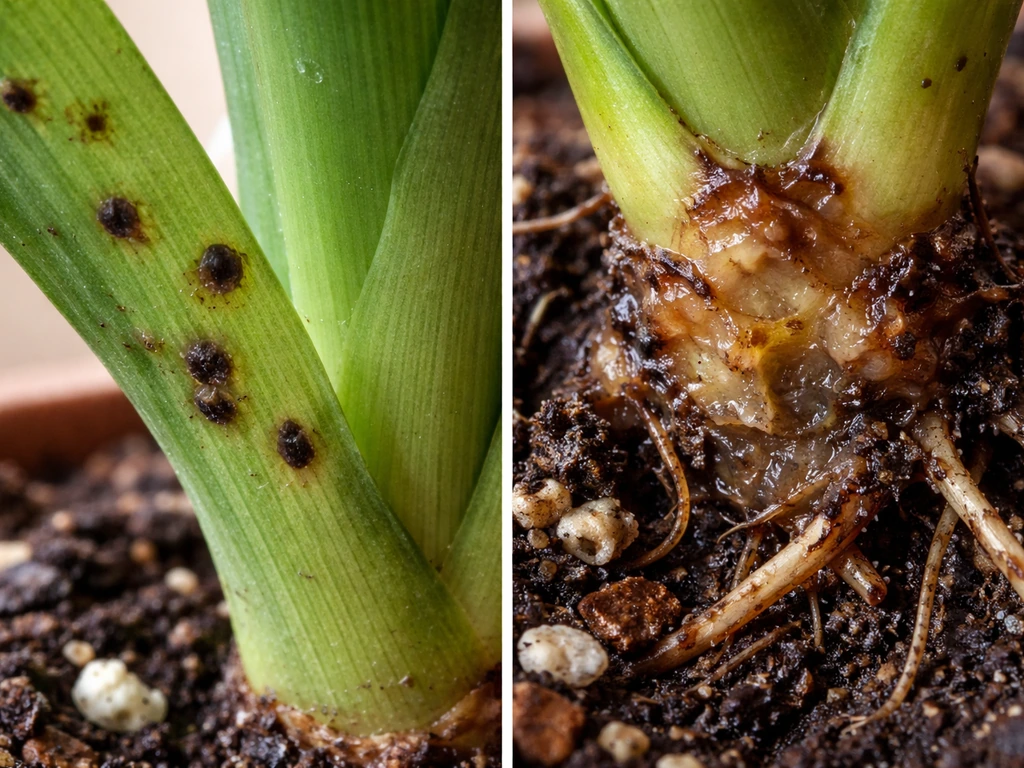
Black or mushy fronds: rot, drainage, and humidity gone wrong
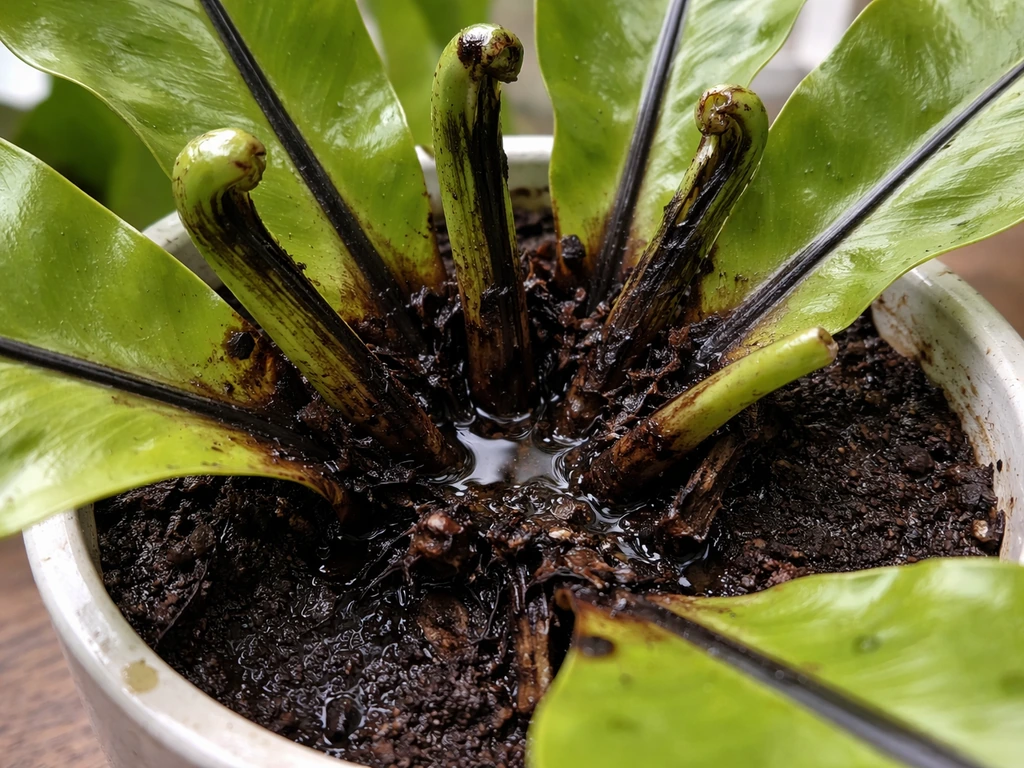
This is the symptom that worries people most, and rightly so. Black, soft, mushy tissue is a sign of rot, and it moves fast. Look closely for bird crop infection symptoms like black or mushy tissue and a bad smell to confirm rot-related problems. If you also suspect canker-like damage, learn the bird canker symptoms to confirm what you're seeing. Root rot and crown rot in houseplants both involve dark brown to black, soft tissue with a distinct bad smell. When you press the affected area and it gives way easily, that's the confirmation. Firm, slightly discolored roots or frond bases are stress; soft and collapsing is rot.
The most direct cause is water sitting where it shouldn't. Bird nest ferns are especially vulnerable to crown rot because of their rosette shape. If you suspect crown rot, review your watering routine and drainage to rule out the most common bird nest spruce problems caused by wet, stagnant conditions. Water that pools in the center of the plant, in that cup-like nest at the heart of the fronds, creates exactly the wet, stagnant conditions that rot thrives in. The fix is simple but important: always water at the soil level, never into the center of the rosette.
Poor drainage compounds the problem. If your pot has no drainage hole, or the potting mix is heavy and compacted, water stays around the roots far too long. Asplenium nidus wants a well-aerated, fast-draining mix, something like a blend of peat or coco coir with perlite. Standard potting soil alone tends to hold too much moisture for this plant over time.
Excess humidity paired with poor airflow can also contribute, especially in enclosed spaces. This combination creates a microclimate where moisture lingers on frond surfaces long enough for pathogens to establish. Good air circulation around the plant helps more than most people realize.
Pests and what they actually look like on bird nest fern
Pests are less common than care problems but they do show up, and the signs can mimic other issues if you're not looking closely. Here's what to check for:
Spider mites
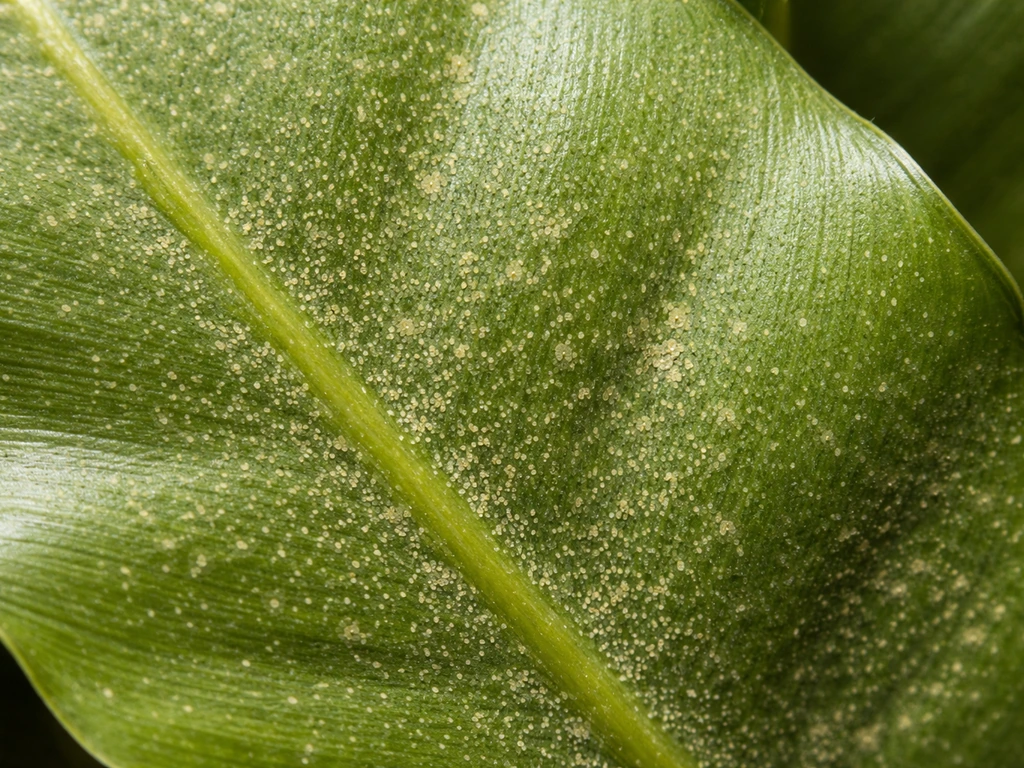
Spider mites are tiny and hard to see, but they leave clear evidence. You'll notice fine, almost dusty stippling on the frond surface, tiny pale dots where the mites have been feeding. This shows up before you actually see the mites themselves. Check the undersides of fronds for fine webbing, which becomes more visible as the infestation grows. Stippled, slightly yellowed fronds with webbing on the undersides is a reliable spider mite ID. Treat with insecticidal soap or a light horticultural oil spray, testing on one or two fronds first to check for sensitivity before treating the whole plant. Living With Bugs notes that blank" rel="noopener noreferrer">insecticidal soap is used for soft-bodied pests such as spider mites and scale crawlers.
Scale insects
Scale looks like small brown bumps along the frond midrib or stem. You might also notice a sticky, shiny residue (honeydew) on the fronds or the surface below the plant, and sometimes a black, sooty coating on top of that stickiness. That sooty mold grows on the honeydew and is a useful indicator that scale (or another sucking pest) is present, since sooty mold alone doesn't just appear. Soft scales can be removed manually with a cotton swab dipped in rubbing alcohol, and insecticidal soap works well on immature (crawler) stages.
Mealybugs
Mealybugs produce white, cottony clusters, usually in the joints where fronds meet the crown or in any tight crevice. They also produce honeydew. A cotton swab with rubbing alcohol handles small infestations. For larger ones, insecticidal soap spray applied to all affected surfaces works well. Mealybugs can hide deep in the rosette, so check carefully and treat more than once, a week apart, to catch any eggs that hatch after the first treatment.
Fungal and bacterial problems: how to tell them apart from rot
Not every dark spot or discolored patch is root rot, and knowing the difference saves a lot of unnecessary repotting. Here's a practical way to sort them out:
| Issue | Texture | Smell | Location | Spread pattern |
|---|---|---|---|---|
| Root rot (fungal) | Soft, mushy roots | Musty or earthy | Below soil, crown | Roots turn dark from tips inward |
| Crown rot | Soft, collapsing base of fronds | Foul, noticeable | Center rosette | Radiates outward from center |
| Bacterial soft rot | Watery, completely mushy | Strong, disagreeable | Any tissue | Rapid, spreading collapse |
| Fungal leaf spot | Firm or dry | Little to none | Leaf surface | Circular/irregular spots with defined edges |
| Pest damage | Firm tissue, stippled surface | None | Leaf surface/undersides | Spreads across frond, webbing or residue present |
The most important diagnostic pair is texture and smell. Wet rot (root rot, crown rot, bacterial soft rot) is always mushy and usually smells bad. Fungal leaf spots are dry and firm with defined edges. Pest damage leaves the tissue firm but visually marked. If you press the affected tissue and it gives way, you're dealing with rot or bacterial breakdown. If it feels solid, look for pest signs or consider a fungal leaf spot.
Bacterial soft rot is worth calling out specifically because it's the most aggressive. Once bacterial soft rot has taken hold in plant tissue, there's no treatment that reverses the infection in affected areas. Your only option is to cut all visibly infected tissue back to clean, firm growth, disinfecting your cutting tool between cuts, and then correct the conditions that allowed it to develop in the first place.
Step-by-step recovery plan
Work through this in order. Don't skip to repotting if the problem is actually just light.
What to do today
- Look at the plant in good light and note: which fronds are affected, where the damage starts on each frond, and whether the tissue is firm or soft.
- Smell the crown and the soil. A bad smell means rot or bacterial infection is already underway.
- Check frond undersides for webbing (spider mites), bumps (scale), or white fluff (mealybugs).
- Stick your finger an inch into the soil. Is it wet, moist, or dry? If it's wet and has been for several days, overwatering is likely.
- Remove all visibly damaged, mushy, or completely brown fronds by cutting them at the base with clean scissors. If rot is present, cut back to firm tissue.
- If root or crown rot is present (soft, dark, foul-smelling tissue), unpot the plant, remove all mushy root material, and let the roots air out for an hour before repotting in fresh, well-draining mix.
- If pests are found, treat with insecticidal soap, applying to all frond surfaces including undersides. For scale or mealybugs, use a cotton swab with rubbing alcohol on visible insects first.
What to monitor over the next 1 to 3 weeks
- Check the crown every few days for any new soft or darkened tissue. Catch rot early and it's manageable.
- Watch new fronds unfurling: healthy new growth in good color is the clearest sign the plant is recovering.
- If you treated for pests, repeat the insecticidal soap application after 7 days to catch any hatched eggs.
- Hold off on fertilizing until you see at least one new frond unfurling normally. Fertilizing a stressed plant does more harm than good.
- Check soil moisture before every watering. In most indoor conditions, you're waiting until the top inch of soil is dry before adding water.
Keeping your bird nest fern healthy long-term
Prevention is genuinely easier than recovery with this plant. Most problems come back to a small set of conditions, and getting these right means you rarely have to troubleshoot at all. If your bird cherry tree has leaf spotting, cankers, or dieback, the same style of symptom checking will help you narrow down the cause Most problems come back to a small set of conditions.
Light
Bright, indirect light is the target. An east-facing or north-facing window with good ambient brightness works well. Direct midday or afternoon sun bleaches and scorches the fronds. A spot that feels well-lit to you but never gets a direct sun patch across the leaves is usually right.
Watering
Water at the soil level, never into the rosette. Let the top inch of soil dry between waterings. In winter or in cooler rooms, this might mean watering every 10 to 14 days. In summer or warmer spots, every 7 days is common. The actual schedule matters less than checking the soil before you water.
Humidity and airflow
Aim for 60 percent humidity or higher. Group plants together, use a pebble tray, or run a humidifier nearby if your home is dry. At the same time, make sure air can move around the plant. Stagnant, humid air without circulation is the combination that invites fungal and bacterial problems. Bird beak problems can also show up when humidity, airflow, and watering conditions leave the plant under stress.
Pot and soil
Always use a pot with a drainage hole. A mix of peat or coco coir with 20 to 30 percent perlite drains well and holds just enough moisture. Repot when you see roots circling the bottom of the pot or emerging from drainage holes, typically every two to three years. Go up only one pot size at a time: too much extra soil holds excess moisture around the roots.
Routine checks
Make a habit of inspecting frond undersides when you water. Catching spider mites or scale at the first sign means a simple soap spray handles it, rather than a full infestation. Also wipe dust from fronds occasionally with a damp cloth, which improves light absorption and makes it easier to spot early pest activity. Because bird nest ferns are light feeders, a diluted balanced liquid fertilizer once a month during the growing season (spring and summer) is plenty. Skip it entirely in fall and winter.
FAQ
How can I tell if yellow fronds are normal aging versus bird nest fern problems?
If only one or two fronds yellow while the newer center stays green and the plant is otherwise growing, it can be normal aging. To confirm it is not a problem, check whether the yellowing is confined to older outer fronds and whether the base of the rosette stays firm and dry (no mushiness or bad odor).
Is it okay to mist my bird nest fern directly to increase humidity?
Avoid spraying water into the rosette. Even if your humidity is good, water trapped in the center can start crown or bacterial soft rot. Instead, mist the surrounding air, or use a pebble tray so the fronds stay dry while the air stays humid.
What should I do right away if I suspect crown rot or bacterial soft rot?
When you suspect rot, stop watering immediately for a short period and remove the plant from the soaking conditions. If the affected tissue is mushy, cut back to clean, firm growth with disinfected scissors, then let the plant dry slightly before returning it to fresh, well-draining mix. Rot that smells bad and collapses when pressed usually cannot be “saved” by a simple surface fix.
My saucer collects water after I water, is that a problem for bird nest fern problems?
If the pot has standing water in the saucer, dump it after watering and check next day. Persistent runoff means your mix is staying too wet or the pot is too large for the root mass, either of which can trigger rot in the rosette.
Do I need to repot after removing rotting leaves, or can I just prune and adjust care?
Yes, but only as a targeted reaction. If you cut off diseased tissue, you usually do not need to repot immediately, as long as the mix drains fast and you fix rosette watering. Repot if the mix stays soggy for many days, smells sour, or the roots are actively rotting.
How do I know if my soil is the real cause of yellowing and rot?
A compacted mix can mimic “overwatering” even if you water carefully. Look for slow drainage (water sits on top for a long time) and consistently wet soil at the next watering time. In that case, refreshing the potting mix and increasing perlite or switching to a chunky fern blend often resolves the cycle.
If my bird nest fern looks stressed, how do I rule out pests versus care issues?
Check the underside of fronds and the tight folds near the center. Spider mites often show stippling and fine webbing before obvious discoloration, and mealybugs commonly hide at joints deep in the rosette. If the plant is otherwise well-lit and correctly watered, early pest signs are a strong next suspect.
How often should I re-treat for spider mites or mealybugs, and how do I avoid burning the fronds?
Use insecticidal soap or a horticultural oil on a small test area first, then treat the whole underside and crevices where pests hide. Re-treat after about a week if pests were present or if you cannot find them all, especially for mealybugs. Stop treatments if you notice new scorched patches, which can happen if the plant is in hot sun during application.
Could yellowing be from too much fertilizer instead of light or watering?
Fertilizer problems usually show up as slow, weak growth rather than sudden mushiness. If you see yellowing with soft or collapsing tissue, treat that as rot or bacterial breakdown first. If you see more even pale color or slow growth, switch to a diluted balanced fertilizer monthly during spring and summer, and skip in fall and winter.
My fern has brown tips, how do I tell dry-air damage from rot?
Brown, crispy edges can be dry air or inconsistent watering, but confirm by touch and location. Crisp margins that stay dry are not rot. If the center or base is soft, browning is likely rot or bacterial damage, even if humidity is high or low.
How can I distinguish fungal leaf spots from bacterial soft rot on my bird nest fern?
The easiest confirmation is texture. Fungal leaf spots are typically dry and firm with clearer borders, while rot or bacterial soft rot is mushy, collapses when pressed, and often has a noticeable bad smell. A “dark spot” that turns soft and spreads quickly usually is not a fungal leaf spot.
If I move my bird nest fern to better light, when should I expect improvements?
Use balanced, bright indirect light and watch the new fronds. Direct hot sun can scorch older tissue quickly, while low light causes gradual loss of deep green and slower new growth. After moving the plant, evaluate for changes in the newest fronds over the next couple of weeks rather than judging immediately by older leaves.
Can high humidity still cause bird nest fern problems if I have it set to 60%?
Target humidity around 60 percent, but also prioritize airflow. If humidity is high while air stays still, moisture lingers on frond surfaces longer and encourages pathogens. A small fan on low near the plant (not blasting directly into the rosette) can reduce repeat outbreaks.
Next Article
Bird Trauma Symptoms: Signs, Triage, and First Aid Steps
Recognize bird trauma symptoms, triage urgency, and give safe first aid for bleeding, fractures, head injuries, and shoc